GIMP is known as the first and foremost photo editor – it can do a lot more than just that, but it was designed to help regular users get the most out of their photography. As a result, we’ve agreed to teach you a basic photo editing procedure for beginners in this tutorial. It begins with opening a picture and concludes with exporting it to whichever file type you want.
Since many people have different preferences when it comes to tool settings, we won’t detail which exact values you can use for each tool listed here, but we can include some essential guidance about why you use a tool and how to use it.
Finally, you’ll be able to make picture edits that you love and that look professional! The more time you give to developing your style and learning how to use GIMP’s gadgets, the happier you’ll get. Let’s get started!
#1: Open the image.
You can begin by opening your picture in GIMP. JPEG is the most commonly used file type in GIMP, so we suggest using it, especially from your camera.
It will open your “Open Picture” window, which you will use to search your screen for the photo location of the file you want to edit. Pick any hard drive from your screen, including external hard drives, in the “Places” segment. Once you’ve chosen a hard drive, you can double-click on folders to navigate through them before you find your image.
You can open the JPEG picture you want by clicking on it. When you click the file, a glimpse of the image appears on the right side of the Open Image dialogue. You’ll open the picture in GIMP by clicking the “Open” tab.
#2: Change the levels.
The levels app is the first photo editing tool you may want to use. This feature helps you to change your image’s brightness/contrast as well as its colors. It’s also a relatively simple tool to use.
You’ll duplicate your essential picture layer in the layers panel before using the Levels function. It ensures that an original copy of the picture is kept as we work. To duplicate the file, make the photo layer your active layer in the Layers dialogue by clicking on it. Then, at the right, press the “Duplicate” button.
You may then rename this duplicate layer by double-clicking on the layer tag. Now, with the edited layer active, you’ll go to Colors > Levels. It will open a dialog box called “Adjust Color Levels.”

#3: Set the values.
By default, the levels tool begins on the “Value” channel, allowing you to change the brightness and contrast of your image. Under the section named “Input Levels,” there is a histogram, a gradient below the histogram that fades from black to white, and finally, a series of three triangles.
Input Levels is a fancy word for the image’s original values before you make any changes. So, the histogram shown under “Input Values” tells you what the original image looks like as a bar graph dependent on shadows, highlights, and mid-tones.
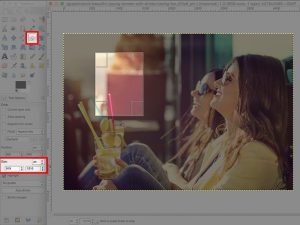
The black triangle helps you change your Gimp image’s shadows by moving the black point. You will increase the number of black pixels by dragging the triangle slider to the right. It will darken your overall picture. You’ll press the Reset button to return the values to their default settings.
The gray triangle changes the mid-tones by changing the midpoint – shifting it to the left brightens the mid-tones, and shifting it to the right darkens them. Finally, the white triangle changes the highlights of the pixels by adjusting the white point – rotating this triangle to the left brightens your highlights while bringing it back to the right darkens them. The values allow you to remove background from image.
Since this is a darker picture, we’ll want to change the levels to brighten it up. We will do this by reversing our histogram. Since our histogram has taller bars on the left side, we can begin by pushing the white triangle to the left. It moves our image’s white point, or in other words, renders the pixels to the right of the white triangle pure white. We brighten the picture by increasing the amount of white in it.
You’ll then brighten the mid-tones by moving the gray triangle to the left. It moves my midpoint to the left, indicating that all pixels to the right of this point are lighter than middle gray, and all pixels to the left of this point are darker than middle gray. Our picture gets lighter as we increase the number of pixels brighter than middle gray and decrease the number of pixels darker than middle gray.
You’ll drag the black triangle to the right marginally as a final move to add contrast. It will marginally darken our picture by increasing the overall amount of pure black pixels, which is good as long as we don’t go overboard. In reality, we get contrast by making bright pixels brighter and dark pixels darker.
Alfie is a writer that started publishing his works at his own website, Scoopfed.com. He loves to write about technology, digital marketing, and trending news. When he’s not writing, he can be found wandering through nature or journaling at a coffee shop.